

A couple of weeks ago Gabby asked me to join the Simple Sew blogger network and I was delighted to hear that it was the Dressmaker’s Ball month in honour of CraftySewandso’s event happening next month. As a strong believer in dressing up for ANY occasion, I couldn’t have timed my arrival any better! Yay....

I jumped straight on to the Simple Sew site and the lovely Alexa caught my eye. I’ve been dreaming of a dress with a simple fitted silhouette to showcase a beautiful African wax cape for sometime. I thought Alexa would be the perfect contender to create something a little like dress number two in the line-up below.

I had the perfect fabric for such a dramatic dress: A beautiful African wax from Vlisco - a Java wax no 5246R. I raided through my stash for a matching lining and found a beautiful sea green viscose from Minerva crafts (included in my wonderful bundle prize for Wendy Ward’s MIYmarch photo challenge), a matching zip and some beautiful gold embroidery thread from my Grandmother’s stash – that got my brain sewing cogs whirring!

I was eager to cut into my fabric but I was a well-behaved seamstress and I patiently cut a toile. FYI: I never let anyone throw curtains away – the backing makes the perfect FREE toiling fabric!

I basted in a zip so I could try it on: things were looking okay but there were a few minor issues. Mainly - the sleeve, it is always the sleeves! It was very difficult to raise my arm (a problem I have often), not ideal for a dress destined for ball-bopping to Gabby Young and Other Animals! I also have a very narrow upper back and a high bust so I lowered the shoulder seam and tapered the centre back seam at the back neckline.

Below are detailed instructions for the sleeve adjustment (one I've made several times now!):
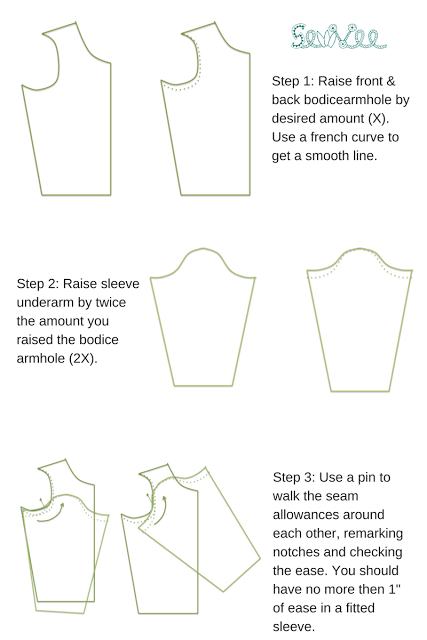
After I had made these adjustments I sewed up the lining and tried the dress on again.

The next step was to cut my shell fabric. Pattern placement was particularly tricky with this print. I actually had to cut the front skirt piece twice before I was happy due to unfortunate triangle placement the first time around. It was worth the effort, and I am really pleased with placement on the finished dress.
I wanted to make this dress EXTRA special. I clearly thought sewing an un-embellished ball gown, moving house and starting a new job just wasn’t enough of a challenge for one week. I decided to embroider the dress with the beautiful gold thread from my Grandmother’s stash and little beads thrifted from an old necklace. This was a lot of work but I’m sure it helped me relax during quite a stressful phase of my life!
I spent many happy hours beading and embroidering the bodice and the hems of the skirt pieces (even in the pub, over breakfast and sunbathing in the park!)

After all that work, sewing up the rest of the dress ‘seamed’ (sorry) a breeze! I fully lined the bodice instead of the facing included in the pattern, and I hand stitched the lining and shell skirt hem, as well as the sleeve hems.
Next I was ready to tackle the peplum/cape. I contemplated sewing the cape into the dress but eventually decided to make it detachable to get maximum wear of the dress. As much as I’d like to pop down to Morrisons disguised as an African Wax vigilante I realise it is probably not the most practical attire for picking up my veggies. I decided to attach the cape to a waistband that fastened at the front of the dress. I drafted a simple half circle skirt and dipped the hem at the front. I wanted some drama to the drape of the cape at the front. The width of the fabric was just about long enough to brush the floor when I was not in heels – perks of being short!

I draped this around my waist whilst in the dress and played with pleats at the hips for fullness. I settled on one single knife pleat at either hip aligned with the dress side seams for maximum peplum drama.
To snazz up the waist band I decided to bead and embroider the front where it met at the waist.

I then attached the cape to the waistband and hand stitched the waistband from the inside and slip stitched the hems. I was done! All ready for the ball.
Here she is in all her non-vigilante glory:

Here is the African Wax caped crusader is full swing…


Embroidery details along the skirt hems and bodice...

Thank you to Simple Sew for the pattern and the wonderful David Maxwell-Wood for the photos. I hope to see you all at the ball!
Lots of love,
Vic x

Stunning!!!
ReplyDeleteWonderful!
ReplyDeleteIt looks amazing!
ReplyDelete--------------------------
CharmPop- Pop up greeting cards"